We have Moved

Come and visit the new site, Bumbles & Light.

30 January


Mikey and I have spent a lot of time playing indoors, cuddling up in soft blankets with stuffed animals, reading books, napping, knitting and playing with toys. We're hiding out you see, from the cold snow outside. We're really enjoying this cozy time, although I have to say that I will be excited when we see the first greenery of Spring.

This morning, however, we were forced to leave our nest in order to catch a little mud-coated bus into town. I needed to buy some food and yarn. Hibernating is not much good when you have very little food in the house, plus you start feeling the need to get outside for some fresh air, no matter how cold it may be.

We chased some pigeons, ate some bread, got caught in a little snow and returned home with our prizes. Mikey loves the little bakery nearby, when he knows that we're on that street he will start saying "bread! bread!" until we get to the door when he will say "Oooooh, bread! Mmm Mmm Mmm!" He likes to eat the little sunflower seed covered wholewheat Brötchen. That is his treat for being a good boy while shopping.


My dear husband is away this weekend, he is just over the border into France for four days, sadly for work and not leisure. He should look forward to coming back to a lovely cozy and clean home.


"The most singular difference between happiness and joy is that happiness is a solid and joy a liquid."
RIP J.D. Salinger
(Quote from Nine Stories)

Read more...

Wordless Wednesday - Dark


Read more...

Knitted iPod Cover

Posted at A Soft Place to Land DIY Day, visit Kimba to see some more DIY projects!

Also posted here, go check out some more craft projects! -


Oh man, I am so pleased with how this came out. It was super fast and easy too, I whipped it up over the weekend.


 You need:

For the case:
Yarn, 1 skein
Knitting Needles (straight. I used size US8, but it will depend on your gauge and what yarn you use.)
Tapestry Needle
2 small safety pins

For the Embellishment:
felt
a button
Thread
Sewing needle


Instructions:

Mine is just a plain knit case, you can really do whatever pattern you like. I liked plain knit because it's simple and doesn't detract from the embellishment.

Cast on the amount of stitches you think you will need for the case to be wide enough. For a snug fit you'll want to use yarn that has a bit of stretch and knit the case slightly smaller than your iPod (or iPhone, or other MP3 Player/Phone). I cast on 14 stitches for mine, I didn't do a test swatch beforehand because I'm lazy, but it might be a good idea so that you can work out how many stitches you need to cast on to get the correct width.

Now, you want to knit until it is long enough to double over the length of the iPod and then leave enough for the little top flap. I just kept measuring mine against the iPod as I was going.

Now, two rows before the end you need to start reducing. That is if you want a nice rounded edge for the top flap. I reduced one, knitted until the last two stitches on the needle and then reduced again. Do this for two rows, then cast off.

Now you have a short, weird looking skinny scarf that would only ever fit a doll or someone with a very small neck. Sew in the tails with the tapestry needle.

Take your iPod and place it in the middle of the knitting. Fold the cast on end up over the iPod and arrange it to the size you'd like it to be, taking care to make sure the flap (cast off end) will fold over the top correctly.

Use the safety pins to hold the shape in place (do not pin down the top flap! Why when I use the word flap do I keep feeling dirty?!).

Now you can do one of two things, you can sew on your embellishment if you think it would be easier to do this now or you can sew together the sides of your cover.

To sew the cover together, thread some leftover yarn onto the tapestry needle and carefully sew over the edges. Firmly secure the yarn on the inside of the cover and sew the tails into the knitting. Remove the safety pins.


For the embellishment I cut two pieces of felt in a curved shape, one larger than the other. I did a running stitch through the bottom edge and pulled it tight to make a rosette on each piece and then secured them. I placed the rosettes one on top of the other (large at the back) and placed the button on top before sewing the entire thing onto the case, taking care to not stitch the insides of the case together (this is why I said it might be easier to do this before stitching the sides together, I however, like to live dangerously.)

Done and done. Put your iPod inside.


Now my iPod feels all cozy and I don't have to worry about it getting scratched when it's in my handbag.

Read more...

Coffee


A cold snowy sunday. Knitting, drinking coffee and reading Great Expectations.

Read more...

Sausage and Smashed Potatoes

Posted at Foodie Friday


I hit 100 followers yesterday!

I started this blog over a year ago with my husband, just before he deployed to Iraq. It was intended as a sort of way for us to keep up with each others interests and things like that. It didn't quite work out, mostly due to the fact that he had a terrible internet connection down range but he was also very busy with work.

I ended up posting most of the time, just bits and pieces about life, photographs and about Mikey. Later I began to post recipes and then crafts. I pretty much completely took over this blog as my own and my husband is no longer interested in it, apart from to poke fun at me when I take photographs of our dinner to post on here! I've watched my number of followers grow steadily over the past few months especially and I am so unbelievably flattered that so many of you are interested in reading what I have to say!

Thank you from the bottom of my heart to everyone who has followed, subscribed (I didn't forget about you guys!) and left me comments. I love you guys!

Anyway, yes... food.

This was a bit of a thrown together, last minute meal. You know, the kind when you realise you really need to go grocery shopping but it's already 5pm? Yeah...

Sausage and Smashed Potato
Partially inspired by recipes from Real Simple, Jan 2010 and Nigella Express

Serves 2 (large servings)

Ingredients

  • about 10 small red potatoes, washed and halved
  • kosher salt
  • black pepper
  • 4 rashers of bacon
  • olive oil
  • 4 German Sausages (we used Bauernbratwurst, not sure what that means but they were good! You could also use Italian Sausage if so inclined.)
  • 1 tablespoon wholegrain mustard
  • 2 tsp white wine vinegar
  • 2 cloves garlic, minced
  • 2 scallions, thinly sliced
  • just under 1/4 cup chopped fresh flat-leaf parsley

Cook the bacon with the garlic until the bacon is crispy. Transfer to a plate, cover with a paper towel and set aside.

Heat 1 tablespoon of the oil in a large skillet over a medium-high heat. Add the sausages and cook, turning occasionally, until browned and cooked through.

Meanwhile place the potatoes in a large saucepan and add enough cold water to cover. Bring to a boil and add 1 teaspoon salt. Reduce heat and simmer until tender, about 18 minutes. Drain.

In a large bowl, combine 2 tablespoons olive oil, mustard, vinegar, a little salt and pepper. Crumble the now cooled bacon into the bowl. Add the potatoes, scallions, and parsley and mix, mashing gently. Cut the sausages into large pieces and serve with the potatoes.


I have to add, I'm not sure what the deal was with my "red" potatoes, they were pale red before cooking but regular potato looking after!

Read more...

Wordless Wednesday - Evening Couch Snuggles


Read more...

Knitted Rabbit Soft Toy


Some Weekend baking, German Apple Cake and Chocolate Chip Cookie recipes from one of my most favourite food blogs, Honey and Jam.


"It is the sweet, simple things of life which are the real ones after all."
Laura Ingalls Wilder

I said I'd had a busy weekend didn't I? We had some friends over for coffee, cookies and cake. I spent most of the morning baking and we spent the rest of the day chatting and knitting.


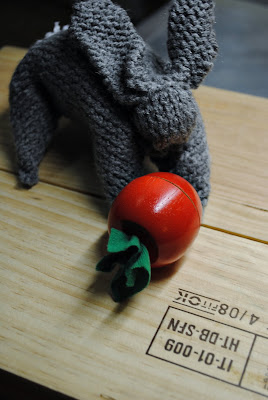
Which leads me to today, I finished knitting a soft toy rabbit for Mikey. His name is Prince Leopold and he is quite a haughty young rabbit.

First off I apologize profusely for the bad photographs. I tried my hardest to get him finished before daylight fell and I sewed on the last ear just as the sun began to set, so not enough light for good photos, meaning I had to take pictures with my kitchen food photo set-up.  It doesn't show him off to his best advantage, plus I had totally wanted to get photos of him hopping around in the grass. But instead you'll have to suffice with him eating one of Mikey's wooden vegetables under a quite unflattering light for woolen rabbits, he wants to insist that he model for me in better light.


He also doesn't have eyes or a nose yet, I ran out of the right colour thread. I'm not much good today, got to dash to the store and pick up some more thread.


Want to know how to make him?


Om nom nom, wooden radish... what? No carrots?


Knit a 6 inch (ish) square: 1 row knit, 1 row purl. You'll need to cast on about 40 stitches depending on the type of yarn you decide to use.

Knit the two ears, cast on 6 stitches and knit until about 2 1/2 inches long then reduce the following two rows each by 2 stitches. Cast off and sew in the loose yarn.

Sew each corner of the knitted square together for 2 inches to form the four legs, use a gathering stitch to sew across the cast on edge and pull lightly to create the rabbit's head. From this gathered edge continue sewing his stomach to the hind legs. Leave an opening for stuffing.

Stuff tightly and tie a length of doubled wool around his neck , pull tightly and knot to make the head. Tie securely under the chin.

Sew up remaining stomach seam and shape the body (squish the stuffing around inside until he looks how you want, maybe stitch the tops of his hind legs to his body if his legs look a little funky.)


Sew on the ears, positioning the corners closer together at the sewn edge to make them stand up.

Sew on eyes and a mouth if you like. Make a pompom out of white yarn and sew on for a tail.


Done!


He totally knows he has a cute butt, see him posing? I personally think he could do with losing some weight but don't tell him I said that.


I cast on my next project after I finished this. I'm making a case for my iPod Touch, something simple.

Posted at DIY day

and

Read more...

Sunday Reflections

I'm up early again, this seems to be a reoccurring theme.  I got up at 5am and it's now around 6.15, I like how quiet it is at this time of day.

I find it odd the way that my OCD works. When you think of someone with the condition you imagine an immaculate house, someone who is obsessive about germs and cleaning, things being orderly and tidy. That is just not the case for me at all.

In early January I forgot to get a refill on my meds and by about day three I devolved back into a mess, complete with withdrawal symptoms on top of that. The house was in a real state, I didn't cook, I didn't really do anything except stew in obsessive thoughts for hours.

I finally went and got a refill and things returned to normal with a vengeance. I cleaned the house from top to bottom, even the bedrooms which I hate doing, and started a whole slew of different creative projects.

I'm currently in the middle of knitting a soft toy rabbit for Mikey, nearly finished it! I have some beautiful new yarn in queue for other knitting projects that I'm really looking forward to starting. I have designs drawn up for a bookshelf for Mikey's books, I'm so sick of picking them up off of the floor! I have a design drawn up for an applique window seat cover for Mikey's bedroom. I've got a skirt sewing pattern that I drew up, waiting for some lovely fabric to fall into my arms and onto my sewing machine.

I mentioned my cooking list in the last blog post, I've got some new dishes and things for taking food photographs and have grand ideas for a studio set-up in the spare room to house all of these projects. At the moment they're spread over various portions of the house and the spare room is doing nothing whatsoever. Scouring the newspaper for old desks to use and things like that! I've also been a lot more creative with my actual cooking, making things up as I go along (with the help of my flavour bible) and having a great time of it all.

Mikey has been loving the snow, we keep going out to play in it and he loves nothing more than to just stomp through it in his boots! Shame it's raining now and the snow is melting away.

But despite the somewhat shaky, un-medicated start of 2010 things seem to be settling down into a wonderful rhythm.

Read more...

Black-Bean and Tomato Quinoa

Posted at Foodie Friday


I don't normally cook Mexican food, I never really ate it when living in England and then when I lived in Texas and was pregnant I developed an aversion to it that never really went away. However I found this recipe in an old issue of Gourmet and thought I'd give it a try for something a little different from my usual fare!

Honestly we weren't disappointed, I've been extra lazy with the cooking lately so it was certainly a welcome change, a healthy one too. I served it with some Garlic Lime Chicken, but it would also go really well with steak or shrimp.

I'm really getting into food photography and styling, except I have very little nice kitchenware to style with. I need to get myself down to a vintage store/flea market and buy some styling items, perhaps later today. That seems funny doesn't it? To buy plates and things specifically for "arranging" food. I didn't know that being a food stylist was an actual job until fairly recently. I don't know if I could do it without being able to eat the food after.


Black-Bean and Tomato Quinoa
Heavily modified from Gourmet, July 2007

Ingredients

  • 2 teaspoons grated lime zest
  • Juice from 1 lime
  • 2 tablespoons unsalted butter, melted and cooled
  • 1 tablespoon olive oil
  • 1 teaspoon sugar
  • 1 cup quinoa
  • 1 (14- to 15-ounce) can black beans, rinsed and drained
  • 2 medium tomatoes, diced
  • 1/2 red bell pepper, diced
  • 3 scallions, chopped
  • 1/4 cup chopped fresh cilantro
  • 1/2 teaspoon cumin (feel free to add more if you like)


Whisk together lime zest and juice, butter, oil, sugar, cumin, 1/2 teaspoon salt, and 1/4 teaspoon pepper in a large bowl.

Cook quinoa according to package directions. Drain and return to pot, removed from heat.

Add dressing to pot of drained quinoa and toss until combined. Stir in remaining ingredients, add salt and pepper to taste.


Can be stored in the refrigerator for up to 4 days. Tastes great the next day, cold, with some chopped, cooked shrimp mixed in.

This totally lifted me out of my cooking rut, I have such a good meal plan now for next week that I'm excited about it. Yeah I know I can't have much excitement in my life if I'm excited about a meal plan! Here it is though,

Saturday Classic Beef Stew
Sunday Sausages with Potatoes and Cornichons
Monday Steak House Chili
Tuesday Shepherd's Pie
Wednesday Lasagna Style Baked Ziti
Thursday Steak and Potatoes
Friday French Onion Soup

On Sunday we're also having a coffee afternoon with some friends, I'm making Apple and Maple Bread Pudding. With all of this I'm going to have to start posting recipes more than once per week! Or perhaps I should just save them up for the weeks when I haven't cooked anything good. This was never supposed to be a food blog, but I'm totally getting into it, ah well.

Read more...

Wordless Wednesday - Italy, 2005


Read more...

Hipster PDA

Posted at A Soft Place to Land DIY Day

Do you use a Hipster PDA? I have several, a few for different kitchen notes and one for craft notes. I find it easier to keep track of different projects if I have somewhere to write them all down, I like notebooks but I find myself ripping out pages when I need them and then losing them later. A Hipster PDA is a tongue-in-cheek name, it's just a few index cards held together with a clip. Really lo-tech, but I thought mine could do with a little sprucing up so I got on Photoshop and made some little front covers for them. They're only simple but I like them and they help me tell which is which at a glance without having to read it.


I'm putting them up for free download if you'd like to use them you can find the download at the bottom of this post. They're for 3x5 index cards. You will need to print them onto card stock and cut them out. Then you'll just need some index cards, a clip of some kind to keep them together and a pen. Make sure your printer scale is set to 100% when you print them otherwise they will be too small (I made that mistake as you can see from my photos and couldn't work it out, but don't worry they come out the right size at 100% scale).

There are also plenty of other resources to help you streamline your Hipster PDA, such as calendars and things like that. Check it out.


I'm going to be putting together a larger DIY planner later in the week and binding a cover for it, I'm probably going to end up using these printed titles as dividers.

My latest knitting project is almost finished, so I'll have that to show you next week and my husband who previously pooh-poohed my knitting attempts has requested a hat for my next project. He thought that my beginner knitting would be loose and uneven but has been surprised (as I have) at how well it has come out. I also need to make an Ipod cover for the Ipod touch that I got for christmas (and am completely in love with) and I wanted to make some cushions to replace our totally worn out couch cushions! I also totally need to put together a notice board for the house, I'll be able to hang my index cards on it. There are plenty of other things I need to get done.

I've got a long list!

My delicious books also arrived this morning, I can't wait to get into these! I just finished reading David Copperfield today so I'm totally ready for some more! It's something about the cold weather that makes me want to curl up with a cup of tea and a classic!


I also got a lovely, crafty Waldorf book with some great ideas for homemade toys that I'll be putting together soon. Looking forward to it!

Click here to download the hPDA title pages!

Read more...

Colours


"Bwoo, " He points a chubby finger at the blue paint.
"Ooooh, lello" His attention moves onto the yellow paint, he touches it and gets some on his fingers. He draws with his paint covered fingers onto the paper and then wipes the rest on his apron.
"Ed?" the red paint, he points again.
"Yes, that one is red, clever boy! Do you want to paint with red?"
"Nooooo... Mummy dis?" pointing at the purple paint.
"That's purple"
"Urbe... Oooh Orrrrrran" His attention swiftly moves from the purple to orange paint. He knows it has the same name and colour as his favourite fruit. He presses his paintbrush into it and sweeps orange paint across his blue paper.

"Mummy, dis?"
"That one is green, green like leaves."
"Ooooh... eafs," as he carefully dabs his paintbrush into the green paint.
"Yes, leaves. Can you say green?"
Pointing little fingers at the end of his paintbrush and peering closely at the green paint he insists, "Eeeeeeafs! mummy, eafs!"


Read more...

Lasagna Style Baked Ziti

 Posted at Foodie Friday and Food on Friday

Before we get into the actual cooking part, I have something to say. My darling boy, who at 2 years old can barely talk, does not sleep through the night and is not potty trained, does know how to make tea. I caught him yesterday playing in the kitchen with one of his plastic cups, a teabag he got off the counter and a teaspoon. He also tried to get the milk out of the fridge to put in it, but I was in time to avert that disaster. But I like to think that I've managed to install in him a good sense of his mummy's culture. I mean, being British is just all about drinking tea, right? I normally let him 'help' when I'm making tea by letting him put the teabags in the cups, he gets pretty excited about it.

But yes, onto the food! This one is a great quick and easy meal.


Lasagna Style Baked Ziti (aka lasagna for lazy people)
Serves 4

Ingredients

  • 1 pound ziti
  • A splash of olive oil
  • 1 medium yellow onion, diced
  • 3/4 teaspoon kosher salt
  • 1/4 teaspoon black pepper
  • 1 pound Italian sausage
  • 3 cloves garlic, minced
  • 1/2 cup chopped fresh oregano (optional)
  • 1 jar pasta sauce (Bertolli Marinara Sauce is best for this, but you can probably use any red sauce)
  • 1/2 cup freshly grated Pecorino (Parmesan is fine too, I just prefer Pecorino.)
  • 1 15-ounce container ricotta cheese
  • 1 cup baby spinach (or more if you prefer)
  • 1 'ball' fresh mozzarella, drained and torn into small pieces (1 cup grated mozzarella from a bag is absolutely fine too)


mmmm, garlic...

  1. Cook the ziti according to the package instructions. Heat oven to 400° F.
  2. In a large pot, over medium-low heat, heat the oil. Add the onion, salt, and pepper. Cook until the onion is softened, about 5 minutes.
  3. Add the Italian sausage, increase heat to medium-high, and cook until no pink remains, about 8 minutes. Drain any liquid, add the garlic and oregano and cook for 2 minutes. Add the pasta sauce and heat for about 3 minutes. Remove from heat.
  4. Add the cooked pasta and toss to coat. Add the Parmesan, ricotta, and spinach and toss again.
  5. Spread the mixture into a 9-by-13-inch baking dish and sprinkle with the mozzarella. Bake until the mozzarella melts and the top is starting to brown, about 15 - 20 minutes.


Read more...

Wordless Wednesday - Baking in Pajamas


Read more...

Buttoned Scarflet Psuedo-Pattern

 Linked up at A Soft Place to Land DIY Day. Check out Kimba's post for for more projects!
Also Linked at Get your Craft On, on Today's Creative Blog. Go and check out more creative projects!

I'm up nice and early, got some yoga done and feeling all refreshed. It's 5.30am, yes I know I'm crazy.

Anyway...

I wanted to teach myself how to knit, but all of the "beginner" patterns I could find were either too complicated or for things that I wouldn't use in a million years. I had one skein of beautiful yarn that I bought on sale for one Euro in one of the department stores in town, so my project would have to be quite small, I wouldn't have enough yarn for an entire full sized scarf.

This isn't a knitting pattern, but a guide to making a really easy and cute beginner knitting project.


Being a beginner, I didn't take note of the type of yarn I had and threw out the wrapper. I have no idea what it was at all, but no matter. You can pick out your own yarn, try to choose something that looks quite warm and snuggly. I used US size 8 needles for this one, I've no idea really how to choose the correct needles for the yarn I have. It usually tells you on the wrapper, but like I said, I threw mine out so it was a guess.

Remember, if this is your first project, it doesn't matter too much if you make mistakes. I frogged (ripped out) this twice while making it because I'd somehow managed to be increasing the amount of stitches every row. I started with 10 and had 24 when I realised what I was doing. My ends are also pretty messy and there are a couple of mistakes in the finished product, but it's a learning project so it doesn't really matter too much.

If you don't know how to cast on, do stitches or anything like that there is a good website here -
http://learn-to-knit.com/index.htm
It gives you guides for both left handed and right handed knitting, which was a godsend for me as I'm left handed.


So, you'll want to cast on 10 stitches. I knitted the entire thing in purl stitch. Actually I thought I was doing knit stitch but realised I hadn't when I finished. It doesn't really matter, use this project as a practice for whichever stitch you like.


Before sewing in ends.

Keep measuring it until you've reached the length you want, really you only need it to be long enough to wrap your neck and then a little extra to overlap.

When you've got the required length, cast off and sew in your tails. I used a plastic kids needle to pull the tails into the stitching.

Now, when I'd finished knitting mine, I realised that it wasn't quite as "fluffy" as I'd have liked it to be. So, I filled a sink with very hot water and a little dish soap. I put in my knitting project, swirled it around and agitated it until it was as fluffy as I wanted. This is a way of felting your knitting, but I didn't want it entirely felted so I stopped sooner. Then I put it out to dry using pins to keep it in the shape I wanted it. Depending on the type of yarn you've used and how long you felt it for it may shrink, so make sure it is long enough.


After being "felted"

When it has dried out you can sew on the buttons. Being a beginner I've no idea how to knit button holes, so my buttons are just for display. I'm sure if you know what you're doing you could do button holes. Choose some cute buttons to go with your yarn and sew them onto your little scarf.


Here in Heidelberg there is a lovely little shop that has an entire wall of buttons. Seriously, an entire wall like some kind of button Mecca. I bought quite a few for future projects too.

So now you've sewn on the buttons you are done. Although you can skip the buttons and use a brooch, that will make the next step a little easier. I was intending to do that originally but I couldn't find my brooch.

To wear this scarflet properly you need to use a safety pin to keep it on. Keep the safety pin underneath the scarflet and you can pin it however you want to wear it. If you've made it long enough you can also tie it like a regular scarf except it wont have the usual long tails that get in the way.


 Both of these are pinned in place with a safety pin.

Not too bad for my first ever knitting project. It's very nice and warm too.

Read more...

I am a 24 year old British stay at home mother to a two year old boy. Married to a U.S. soldier and currently living in Germany.

I have seen the Vatican from the very top of St Peter's Basilica, the mud in the World War I trenches outside Ypres. I have walked through Montmartre side streets bustling with people in the evening, gotten lost in the streets of Greenwich Village NYC, run through cornfields on the Welsh border and sat outside with a cup of tea watching fireflies in the fields of the outer Chicago suburbs.

I have held the hands of others through addiction, fear, suicide, despair and come out the other side. I have left everything behind to begin anew.
I have fought mental illness and walked through snow in the mountains of the lake district, England. I have explored the morgue in the bowels of an abandoned hospital on a summer evening, climbed to the top of scaffolding on the outside of a five floor warehouse to look at the city lights of Nottingham at night and I have watched the sun setting on the Texas horizon.

I have held my son's tiny hand through the plastic window on an isolette in the NICU ward. Walked, speaking only in whispers, through the catacombs beneath the ground on the outskirts of Rome and seen the fireworks over Heidelberg castle.

Photobucket