Knitted Rabbit Soft Toy
>> Tuesday, January 19, 2010 –
craft
Some Weekend baking, German Apple Cake and Chocolate Chip Cookie recipes from one of my most favourite food blogs, Honey and Jam.
"It is the sweet, simple things of life which are the real ones after all."
Laura Ingalls Wilder
I said I'd had a busy weekend didn't I? We had some friends over for coffee, cookies and cake. I spent most of the morning baking and we spent the rest of the day chatting and knitting.
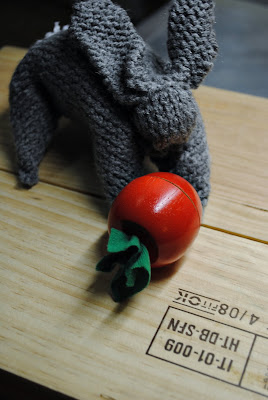
Which leads me to today, I finished knitting a soft toy rabbit for Mikey. His name is Prince Leopold and he is quite a haughty young rabbit.
First off I apologize profusely for the bad photographs. I tried my hardest to get him finished before daylight fell and I sewed on the last ear just as the sun began to set, so not enough light for good photos, meaning I had to take pictures with my kitchen food photo set-up. It doesn't show him off to his best advantage, plus I had totally wanted to get photos of him hopping around in the grass. But instead you'll have to suffice with him eating one of Mikey's wooden vegetables under a quite unflattering light for woolen rabbits, he wants to insist that he model for me in better light.
He also doesn't have eyes or a nose yet, I ran out of the right colour thread. I'm not much good today, got to dash to the store and pick up some more thread.
Want to know how to make him?
Om nom nom, wooden radish... what? No carrots?
Knit a 6 inch (ish) square: 1 row knit, 1 row purl. You'll need to cast on about 40 stitches depending on the type of yarn you decide to use.
Knit the two ears, cast on 6 stitches and knit until about 2 1/2 inches long then reduce the following two rows each by 2 stitches. Cast off and sew in the loose yarn.
Sew each corner of the knitted square together for 2 inches to form the four legs, use a gathering stitch to sew across the cast on edge and pull lightly to create the rabbit's head. From this gathered edge continue sewing his stomach to the hind legs. Leave an opening for stuffing.
Stuff tightly and tie a length of doubled wool around his neck , pull tightly and knot to make the head. Tie securely under the chin.
Sew up remaining stomach seam and shape the body (squish the stuffing around inside until he looks how you want, maybe stitch the tops of his hind legs to his body if his legs look a little funky.)
Sew on the ears, positioning the corners closer together at the sewn edge to make them stand up.
Sew on eyes and a mouth if you like. Make a pompom out of white yarn and sew on for a tail.
Done!
He totally knows he has a cute butt, see him posing? I personally think he could do with losing some weight but don't tell him I said that.
I cast on my next project after I finished this. I'm making a case for my iPod Touch, something simple.
Posted at DIY day
and


Post a Comment
Please do not use the blogger comment form to leave a comment as no one will be able to see it! Please use the intense debate form above.